Showing posts with label jan geisen. Show all posts

Saturday, February 2, 2013

HELEN BREIL'S SHAPES eBOOK


Helen Breil, a wonderful polymer clay artist from Canada, has just released an eBook called "Shapes".  The book shows how to create 25 unique dimensional multi shape pendants.


 I was asked to create a jewelry item for the book's gallery using one of the 25 designs.  This is the necklace that was in the book's gallery and it's gallery page.


This wasn't the only piece I created.  Here are the other three.


Now I just have to find time to try the other 24 shapes in the book.


IMAGE TRANSFER USING DONNA KATO'S WATER BASED TECHNIQUE

I just started playing with image transfers, which I haven't done in a very long time.  Previously I had done transfers using Lazetran Silk paper.  My reason for working with transfers again was a post that had a link to a Donna Kato video of her water based technique. Check out her free tutorial  Donna Kato's Polymer Clay Image Transfer Technique.  I found the technique extremely easy to do.  I don't know if all laser printers work as well.  I have a Samsung CLP 315W.

A few comments on the video:
  1.  She doesn't specify how long to let the image sit before spraying with water.  I sprayed it as soon as I was done burnishing. 
  2. I found it easy to feel when all the paper was off of the clay, so I used touch more than sight to know when all the paper was off.
  3. I also ran running water over the clay to get the last bits of paper off.
  4. I also did a quick test with a laser copy that has been sitting in my studio for a couple of years.  It transferred, though there was an area that didn't transfer as well.  I can't say for sure if it was because the transfer was old.  I used previously conditioned clay, but it was still pretty cool when I placed the transfer over it.  Since my studio is in the basement of my Minnesota (in winter) home, and the heat wasn't on, the 53 degree room temperature might have had something to do with it.

This is a pendant in progress using the first image I transferred.  The image on clay is as good as the image was on the paper.  The portion within the gold metal frame is slightly domed.  I didn't have any problems with the image cracking when it was slightly stretched to dome.

Thursday, October 25, 2012

Polymer Cafe Monthly Challenge

I just got my December 2012 issue of Polymer Cafe and was thrilled to see that I won fist place in their monthly challenge whose theme was Black and White.  The three intricate main beads were created using two techniques from my tutorial "Jan's Jacob Ladder Variations" which is a fun, and easy way to create highly patterned polymer clay designs. 

If you are interested in giving it a try, the tutorial is for sale in my Etsy shop www.jangeisen.etsy.com


Thursday, January 5, 2012

NEW TEXTURING AND MOKUME GANE TOOL

I just got my order from Jerry's Artarama for a special effects painting palette knife set.  It looked really cool and I thought it would be great for texturing and impressing clay for mokume gane.  I need to try using it for texturing colored liquid clay also - to paint with clay.  It is available online at: http://www.jerrysartarama.com/discount-art-supplies/brushes-and-palette-knives/palette-knives/creative-mark-fx-special-effects-palette-knives.htm

Sunday, December 11, 2011

YOU NEVER HAVE TO WORK ALONE

In 1990 I went to visit my friend Mary who lives 600+ miles away.  Because she couldn't take time off work to be with me the whole time I was there, I needed to entertain myself.  So I brought t-shirts and fabric paint to play with.  Mary and I continued to paint t-shirts in the evenings.  We had so much fun Mary asked if we could do it again the following year.  Thus was born A&C (Arts and Crafts) Week. 

The next year we discovered polymer clay and tried to create millefiori beads.  We both collect African Venetian Glass Trade Beads.  We were using Cernit brand.  That brand doesn't hold its sharpness after baking, so we were disappointed in the final results.  The following year we discovered Fimo brand.  Nan Roche had also published her book The New Clay, which was the only book on the subject available at that time.  A lot of us referred to it as The Bible.  I still think it is the best book on the market for beginners. 

A&C Week has continued every year since.  We probably should call it something else since we only do polymer clay now, with a couple of days worth of exploration with precious metal clay.  It is also 12-15 days of intensive clay play.  It is very hard to go back to our regular lives when it is over.

Recently I was talking to Mary and she was feeling pretty blue.  Winter was setting in, so all the fun outdoor stuff she does (like gardening) was done for the season.  We had occasionally Skyped since we both have computers with webcams.  However neither one of us has thought about Skyping while working - DUH.

So on Tuesday December 6, 2011 - A&C Weekly was born.  Now we can still sit across the work table from each other and talk while we work.  It isn't as easy to see what the other person is doing.  Holding up something in front of the camera isn't the same as passing the item across the table, or getting up and looking over the person's shoulder.  But it isn't bad.  So if you have a laptop computer and friends with laptops that you like to work with who can't be there in person, try Skype (http://www.skype.com/).  It's free and there doesn't seem to be a time limit.  We worked for 3 hours with no service interruptions.  We have reserved every Tuesday night for A&C Weekly until next spring.   


Monday, October 17, 2011

AN INTRODUCTION TO THE PRINCIPLES OF DESIGN

I wrote an article for Polymer Cafe magazine - "An Introduction to the Principles of Design".  I just got my copy of the magazine.  They did a nice job.  The article runs for six pages and includes both the article on the principles of design and also the excercises I created for exploring those principles.  It looks like they didn't edit anything out.


Monday, July 25, 2011

POLYMER CLAY TUTORIAL IS NOW FOR SALE

I did a tutorial on crackling polymer clay using alcohol inks for the premier issue of the new magazine From Polymer to Art.  That first issue has been sold old and the publisher has given me permission to sell the tutorial.

I created a slightly expanded version of the magazine article.  The tutorial has more examples of additional, more complicated, jewelry items that I created using the tutorial's crackle sheet.  The tutorial is for sale my Etsy shop:  http://www.jangeisen.etsy.com/.  I always try and have one tutorial listed for sale.  If there aren't any for sale please contact me, or just check again later. 


NEW POLYMER CLAY TUTORIAL FOR SALE

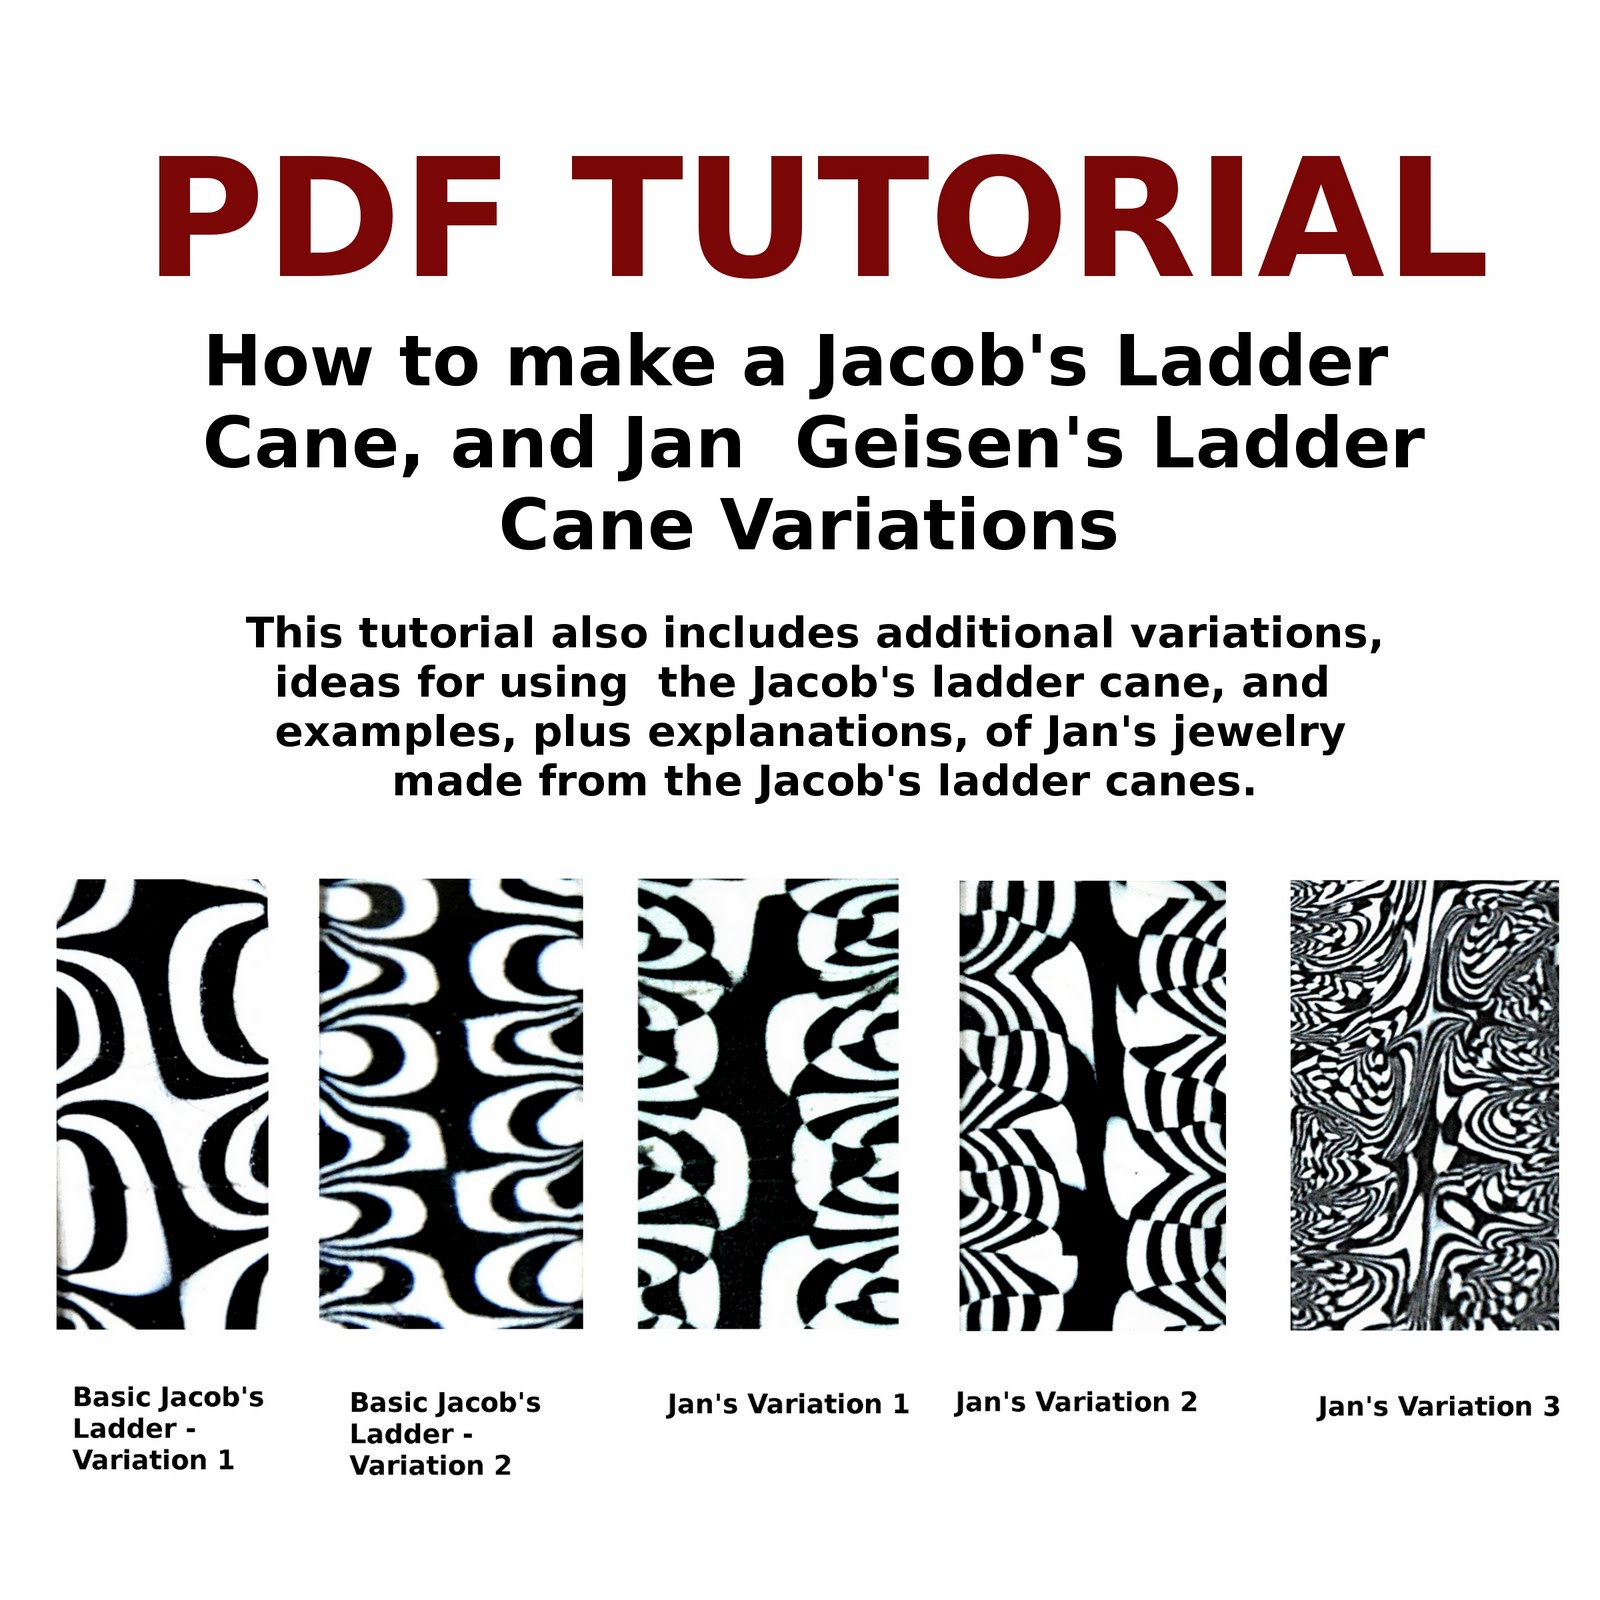
I have just finished another polymer clay tutorial.  It was a lot of fun, but more involved than I expected - too many variations, not enough time.  The tutorial shows how to create what some people refer to as a Jacob's Ladder cane.  It contains step by step instructions for two variations of the Basic Jacob's Ladder, plus three of my own.  I have also included a list of 15 other ways to vary the Jacob's Ladder pattern with three of them with photographs.  There is also a section on ways to use the ladder, plus photos with explanations of 13 pieces of jewelry I created with the cane. 

The tutorial is for sale in my Etsy shop:  http://www.jangeisen.etsy.com/

Monday, February 7, 2011

Another example of an artist's jewelry using my tutorial from the magazine From Polymer To Art

Another artist sent me a photograph of jewelry she created using my tutorial from the magazine From Polymer to Art.  Her name is Cindy and she lives in the Netherlands.  It is so much fun seeing what other artists are doing with the technique.


Saturday, February 5, 2011

Wednesday, February 2, 2011

OTHER ARTIST'S USE OF MY TUTORIAL TECHNIQUE

I love seeing what other people do using my techniques.  It is amazing how much variation there can be when an artist puts his/her personal touch into a technique.  These jewelry pieces were created by Madreselva61 who lives in Spain.  You can see her jewelry on Flickr http://www.flickr.com/photos/46799817@N07/

I rarely make beads anymore.  I am going to have to try making some using my alcohol technique.  I really like how these turned out.


My alcohol technique looks really nice on irregular shaped disk beads too.
TUTORIAL

I wrote a for the preview issue of a new polymer clay magazine, From Polymer To Art, that is being published in the Netherlands.  The issue came out in November 2010.  My tutorial showed how I created this pendant and earrings using alcohol inks

I love making more complicated, abstract, wearable art jewelry pieces.  So for the article the following pieces were also included in the article with a short explanation of how they were created


.

Sunday, November 14, 2010

NEW POLYMER CLAY MAGAZINE

There is a new polymer clay magazine that has just been published.  The premier issues became available November 8th.  It is called From Polymer to Art.  It will be published four times per year.  Each issue will have a color theme.  The premier issue's theme is Red.   It is published in the Netherlands and is written in english.  I don't know if it is available anywhere in the United States yet, but can be purchased online at http://www.frompolymertoart.com/.

I have a tutorial in it on using stencils and alcohol ink to get colored patterns on the clay.  I haven't received my copy yet and am excited to see it.


Saturday, May 22, 2010


In April 2007, HGTV video taped me making a plant stake for their series That's Clever.  They finally ran the episode (#532) last week, so I get my six minutes of fame.  It can be found on YouTube:  http://www.youtube.com/watch?v=VX0eNm6BMwI  Enjoy!

Monday, January 25, 2010

WINTER BREAK

Now that the holiday season is over I need a break.  Having to make a lot of jewelry for the gallery's christmas season caused a little burn out.  So I needed to find something fresh and different to do.  Normally I am a total improv artist.  I don't usually do anything structured.  So for something different, I started working on a scientific experiment.  I am testing the crackling process of paint on polymer clay.  It sort of got out of hand.  To date I have tested nine different types of acrylics.  It is amazing how different the crackle characteristics are for each product.  I plan to turn this experimentation into a tutorial/reference guide for the process.  However, now I need a break from that too.

Almost three years ago I was photographed for an HGTV program called That's Clever making a plant stake out of polymer clay, glass, and copper.  Well they are finally in season 5 and my episode (532) should be shown in the next couple of months.  They are airing episode 526 at the end of February.  My episode isn't listed on HGTV's website yet.

So to give myself something different to do, again, I started making mini plant stakes (more like everlasting flowers).  I am using jewelry components, copper and sometimes polymer clay.  It has been fun.  Each one is unique.  They look good placed in a pot with a small plant, or in a small vase.  They are for sale in my garden Etsy shop http://www.jangeisengardenart.etsy.com/


Friday, October 30, 2009

HOW DO YOU DO THAT?
TIPS AND TECHNIQUES, PART 3
PAINTED SURFACES - CRACKLE PATTERNS
I had someone email me asking if I would consider doing an on-line class. The person really liked some of my techniques. Because my style is so "improve" I figured I could never do anything that structured. However I don't mind sharing my techniques. Feel free to use these techniques and make them your own. I think of polymer clay as "Adult Playdough". Play with the techniques and learn from your mistakes. Some of my favorite discoveries were from mistakes. This is the third post to answer my fan's questions.

Most of my pieces incorporate surface treatments.  One of the techniques I use involves coating a sheet of polymer clay with paint, letting it dry, then running it through the pasta machine.  Since paint doesn't stretch like polymer clay, it will crackle.  I have used four different types of paint.  Each produces a different effect.

1.  ACRYLIC PAINT

The first paint treatment I ever tried was acrylic paint (the kind in the tube).  The one characteristic you need to know is that acrylic paint stretches.  So to get it to crackle you will need a thick base sheet.  I keep adding a new base sheet until I get the crackle effect I want.


I used acrylic paint on these earrings.  I made them a long time ago, so I don't remember a lot of the specifics about the technique I used.  I did cut the painted clay sheets into thin strips and put them on a new clay base.   I looks like I did this twice, laying the second strips 90 degrees from the first direction.  That is how I got both vertical and horizontal sections.  Some of the colors might be from clay, not paint.

One benefit of using acrylic is that you can lay down colors and either blend them or not.  If you don't want them blended just wait for the first color to dry before painting on the second color.


2.  TEMPERA PAINT

The paint treatment I use the most is Tempera Paint, in metallic colors.  It is water based and since it doesn't stretch, it crackles very nicely.  The crackle pattern is much coarser than the acrylic paint.  The one thing you can't do is lay on multiple colors, and NOT have them mix.


These earrings were treated with four colors of metallic tempera paint and crackled. The base clay was white.


These earrings were treated with some the same tempera metallic colors as the first pair of earrings.  However the base clay consists of multiple colored clays.


The effect of the surface treatment can be as bold, or as sutle as you want.  The more you crackle the paint, the smaller the tempera particles will get.  Gold and silver paint was used on both the brooch and the earrings.  The earring's paint treatment is reduced to subtle, tiny specks.  Both pieces used multicolored base clay.

3.  BYZANTIA TEXTILE AND CRAFT MEDIA

This is an acrylic paint I found at Polymer Clay Express ( http://polymerclayexpress.com/paints2.html ).  It is thinner than tube paint and works very well on black clay.  It's crackle pattern is very subtle.  I noticed other really interesting types of paint on this Polymer Clay express web page.  More things to to try!!!!!!


4.  ACRYLIC INK

At Dick Blick I found something called Pearlescent Liquid Acrylic by Daler-Rowney Ltd.  It is like a very thin metallic acrylic paint.  I don't have any examples where I used it for this surface technique.  I do remember that it works very well on dark clay.  It seems to crackle more like Tempera paint than tube acrylic paint.  It works very well with a surface technique I will discuss in a future blog.

MY BELLYDANCER TORSO PROJECT


A close up photo of a dancer's torso led me to do a Bellydancer Torso Project.  I went through four years of dancer photos I had taken and found nice ones to crop into just torsos.  The result was a 13 month 2010 calendar.  It is for sale at:  http://www.lulu.com/content/lulustudio-calendar/bellydancer-torsos/7751601

You can view all pages of the calendar on the website.  Just click on "Preview" located below the photo of the cover.

Support independent publishing: Buy this calendar on Lulu.></a></P>
<P><BR></P>
<P><BR></P>
<P class=separator style=


Friday, October 9, 2009

HOW DO YOU DO THAT?
TIPS AND TECHNIQUES, PART 2
IMPRESSIONS IN CLAY

I had someone email me asking if I would consider doing an on-line class. The person really liked some of my techniques. Because my style is so "improve" I figured I could never do anything that structured. However I don't mind sharing my techniques. Feel free to use these techniques and make them your own. I think of polymer clay as "Adult Playdough". Play with the techniques and learn from your mistakes. Some of my favorite discoveries were from mistakes. This is the second post to answer my fan's questions.

Rubber stamps aren't just for paper, and neither are other impression making tools.  Use anything that makes a nice impression.  I am a great fan of the on-line store Polymer Clay Express  http://www.polymerexpress.com/.  They carry a very nice selection of rubber stamps, texture plates, texture rollers and "molding mats".  Since this is a store dedicated to polymer clay the stamps they carry are all nice and deep.  That is really important for getting a good impression in clay. 

Remember that you will get the reverse impression in the clay.  I like having a mix of both "iny and outy" stamps.  Polymer Clay Express even carries some stamps that come in both a positive and negative.

You need to use some type of release agent to prevent the clay from sticking to the texturing material.  I prefer to use corn starch.  I have never had it affect the clay.  Some people use water.  If you don't like how the impression turned out, just smooth out the clay and try again.  A couplt coatings/impregnations of the clay with corn starch has never been a problem for me. 

I am always hunting in craft stores, hardware stores and anywhere else for items that I can use for impressions.  I got in the habit of doing this many years ago after watching a Victoria Hughes video on Mokume Gane.  She used a wide assortment of objects to press impressions into her clay - phillips screwdriver, adding machine paper core, plastic carpet protectors were some of her favorites.  I now have a couple of drawers full of fun texturing tools.  Look for thinks that will push the clay, not cut it.  Anything with too sharp an edge will cut, not push and distort.

The best texturing plates I ever found are the Cuttlebug Embossing folders.  They are stiff plastic folders designed to emboss paper.  The paper is put in the folder and it is run through the Cuttlebug embossing machine.  What is so cool about this product is that it simultaneously embosses the front and back of clay.  One side is positive and one side is negative.  I purchased some of my folders at Michael's crafts, scrapbooking stores and on-line.  Hobby Lobby and JoAnn Fabrics may carry them also.  I just dust with corn starch and put a sheet of clay inside.  Then I run a roller over the outside.  Because the clay is sandwiched inside it can't slip so I get a nice clean impression.

Oh yeah - don't forget to try impressions in clay with an inked stamp.  You will have to use a archival permanent ink pad.  Do not use Dye Ink pads.  These do not dry.  Be careful, the ink may not try until the piece is baked.    I don't remember if they dry before baking, it has been quite a while since I did anything with an inked pad. I will have to try that technique again.

Here are some jewelry examples the incorporate textures.


This bead is a simple rubber stamp impression with an inked stamp.  You get a nice dark impression.  I don't think you would get the same amount of detail if you just stamped without ink and used paint later to antique it.  Because I stamped on to a flattened oval bead I got an impression only on the top flat surface.   I like the effect of the flat edge all around the impression.


  This brooch's squares texture was made using a Cuttlebug Embossing Folder.  It incorporates both the positive and negative sides of the clay.  I will discuss the coloration techniques in a future posting.


  Another way of getting a raised texture on clay is with a stencil.  Even a paper stencil will work.  Lay the stencil on the clay and run over it with a brayer.  The clay will puff up through the openings.  If you are using a metal or plastic stencil you can increase the puffyness by pressing down on the metal surrounding the openings.   The spiral on the pendant to the left was made with a stencil.  While the clay was still covered with a stencil I highlighted the spiral with silver mica powder.


And don't forget the impressions of Mother Nature!!  If you are using leaves look for ones with nice thick veins and take the impression from the under side of the leaf. 


You can also press items (leaves, rubber stamps, etc) into a thick sheet of clay and use it as a mold to reverse the image. Use the mold to get the final impression for your project.  These earrings were made from a mold I created by impressing a Queen Anne's Lace flower.