Showing posts with label jewelry. Show all posts

Saturday, February 2, 2013

IMAGE TRANSFER USING DONNA KATO'S WATER BASED TECHNIQUE

I just started playing with image transfers, which I haven't done in a very long time.  Previously I had done transfers using Lazetran Silk paper.  My reason for working with transfers again was a post that had a link to a Donna Kato video of her water based technique. Check out her free tutorial  Donna Kato's Polymer Clay Image Transfer Technique.  I found the technique extremely easy to do.  I don't know if all laser printers work as well.  I have a Samsung CLP 315W.

A few comments on the video:
  1.  She doesn't specify how long to let the image sit before spraying with water.  I sprayed it as soon as I was done burnishing. 
  2. I found it easy to feel when all the paper was off of the clay, so I used touch more than sight to know when all the paper was off.
  3. I also ran running water over the clay to get the last bits of paper off.
  4. I also did a quick test with a laser copy that has been sitting in my studio for a couple of years.  It transferred, though there was an area that didn't transfer as well.  I can't say for sure if it was because the transfer was old.  I used previously conditioned clay, but it was still pretty cool when I placed the transfer over it.  Since my studio is in the basement of my Minnesota (in winter) home, and the heat wasn't on, the 53 degree room temperature might have had something to do with it.

This is a pendant in progress using the first image I transferred.  The image on clay is as good as the image was on the paper.  The portion within the gold metal frame is slightly domed.  I didn't have any problems with the image cracking when it was slightly stretched to dome.

Monday, July 25, 2011

POLYMER CLAY TUTORIAL IS NOW FOR SALE

I did a tutorial on crackling polymer clay using alcohol inks for the premier issue of the new magazine From Polymer to Art.  That first issue has been sold old and the publisher has given me permission to sell the tutorial.

I created a slightly expanded version of the magazine article.  The tutorial has more examples of additional, more complicated, jewelry items that I created using the tutorial's crackle sheet.  The tutorial is for sale my Etsy shop:  http://www.jangeisen.etsy.com/.  I always try and have one tutorial listed for sale.  If there aren't any for sale please contact me, or just check again later. 


NEW POLYMER CLAY TUTORIAL FOR SALE

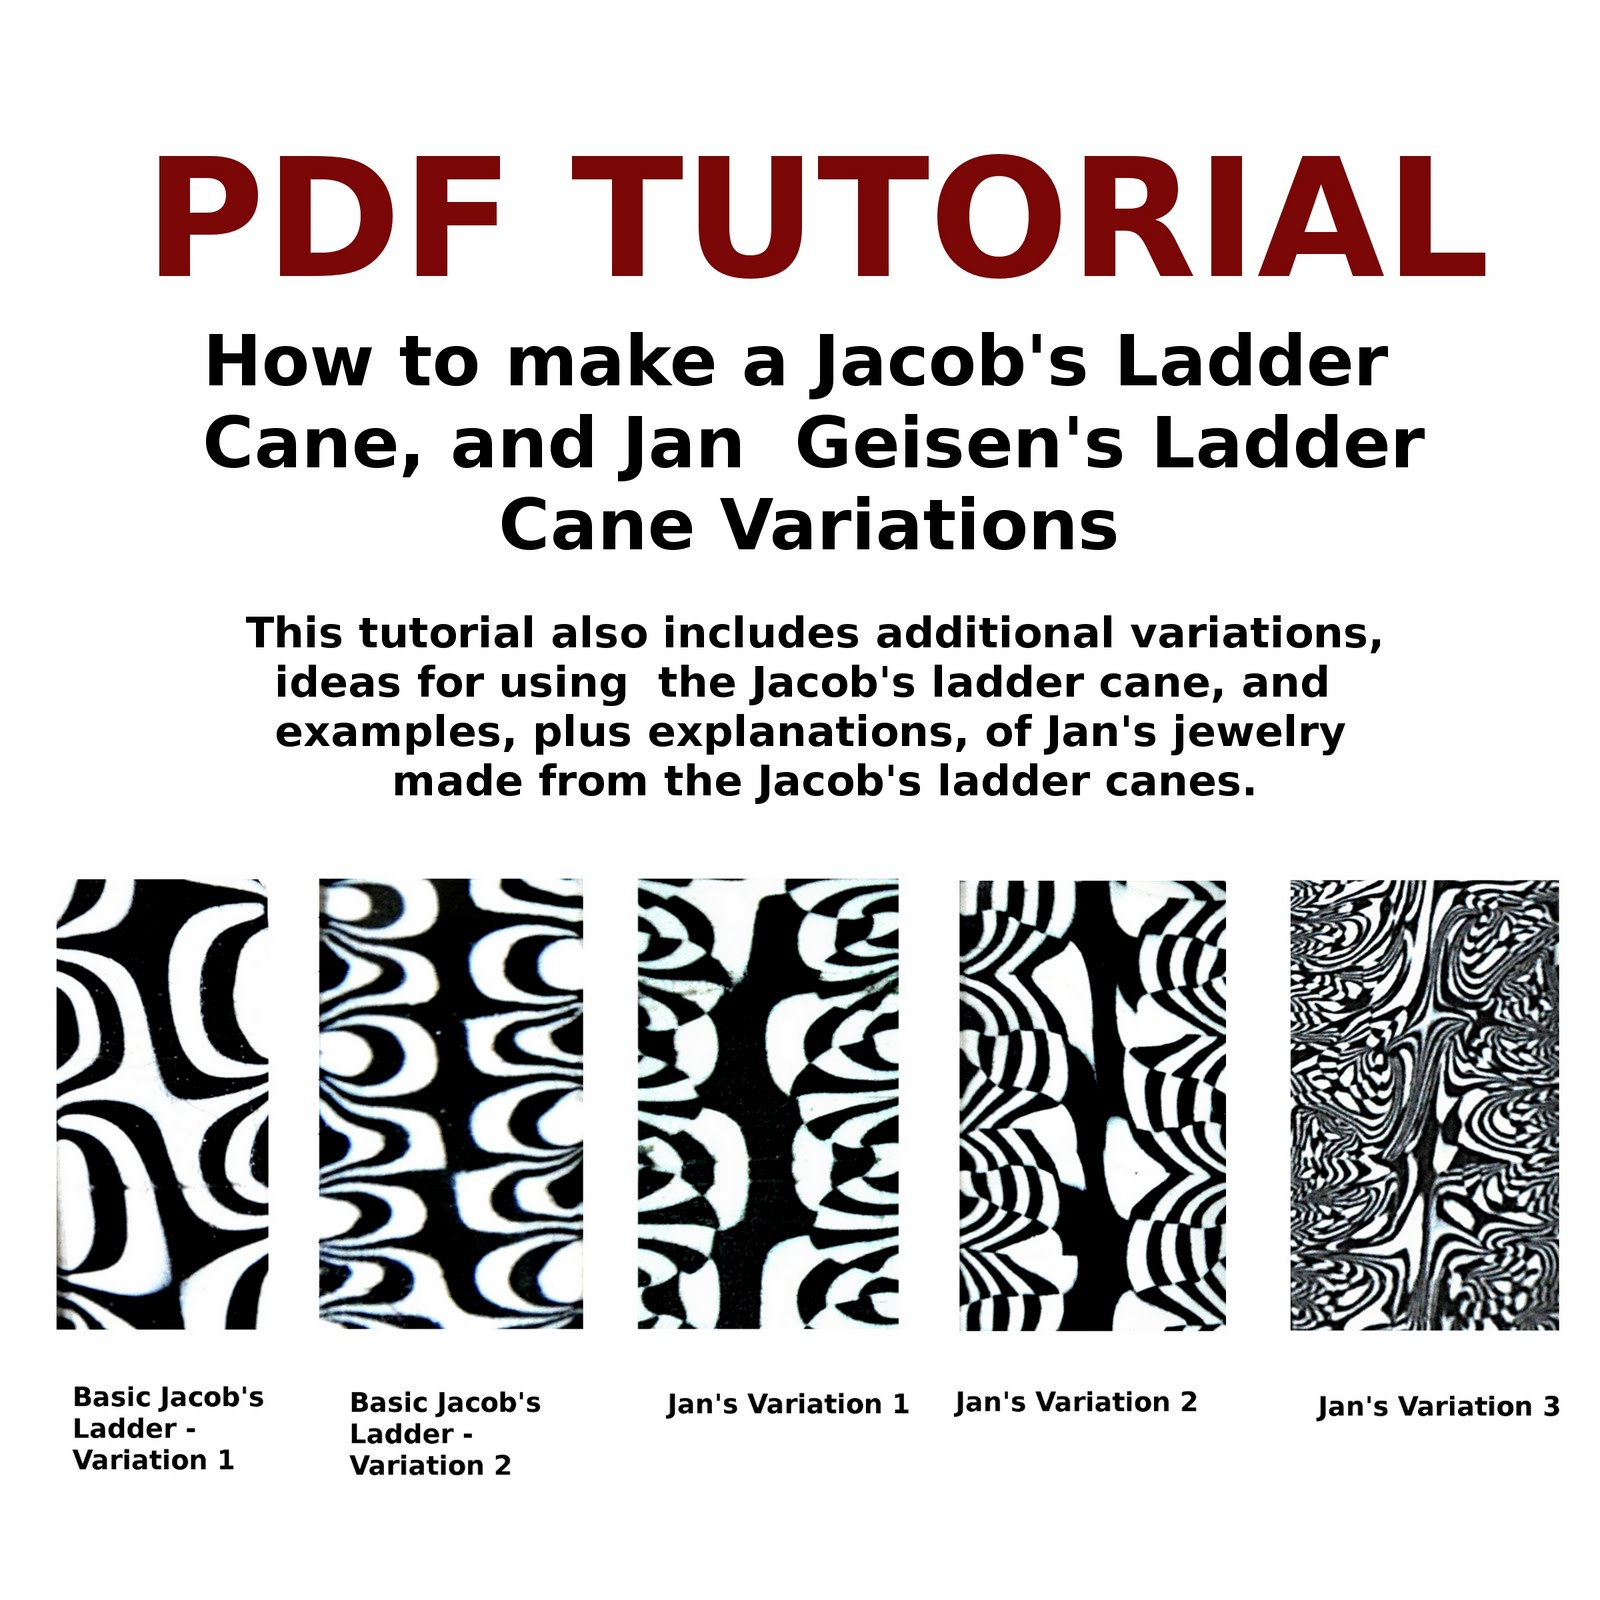
I have just finished another polymer clay tutorial.  It was a lot of fun, but more involved than I expected - too many variations, not enough time.  The tutorial shows how to create what some people refer to as a Jacob's Ladder cane.  It contains step by step instructions for two variations of the Basic Jacob's Ladder, plus three of my own.  I have also included a list of 15 other ways to vary the Jacob's Ladder pattern with three of them with photographs.  There is also a section on ways to use the ladder, plus photos with explanations of 13 pieces of jewelry I created with the cane. 

The tutorial is for sale in my Etsy shop:  http://www.jangeisen.etsy.com/

Saturday, February 5, 2011

Wednesday, February 2, 2011

TUTORIAL

I wrote a for the preview issue of a new polymer clay magazine, From Polymer To Art, that is being published in the Netherlands.  The issue came out in November 2010.  My tutorial showed how I created this pendant and earrings using alcohol inks

I love making more complicated, abstract, wearable art jewelry pieces.  So for the article the following pieces were also included in the article with a short explanation of how they were created


.

Sunday, November 14, 2010

NEW POLYMER CLAY MAGAZINE

There is a new polymer clay magazine that has just been published.  The premier issues became available November 8th.  It is called From Polymer to Art.  It will be published four times per year.  Each issue will have a color theme.  The premier issue's theme is Red.   It is published in the Netherlands and is written in english.  I don't know if it is available anywhere in the United States yet, but can be purchased online at http://www.frompolymertoart.com/.

I have a tutorial in it on using stencils and alcohol ink to get colored patterns on the clay.  I haven't received my copy yet and am excited to see it.


Friday, October 9, 2009

HOW DO YOU DO THAT?
TIPS AND TECHNIQUES, PART 2
IMPRESSIONS IN CLAY

I had someone email me asking if I would consider doing an on-line class. The person really liked some of my techniques. Because my style is so "improve" I figured I could never do anything that structured. However I don't mind sharing my techniques. Feel free to use these techniques and make them your own. I think of polymer clay as "Adult Playdough". Play with the techniques and learn from your mistakes. Some of my favorite discoveries were from mistakes. This is the second post to answer my fan's questions.

Rubber stamps aren't just for paper, and neither are other impression making tools.  Use anything that makes a nice impression.  I am a great fan of the on-line store Polymer Clay Express  http://www.polymerexpress.com/.  They carry a very nice selection of rubber stamps, texture plates, texture rollers and "molding mats".  Since this is a store dedicated to polymer clay the stamps they carry are all nice and deep.  That is really important for getting a good impression in clay. 

Remember that you will get the reverse impression in the clay.  I like having a mix of both "iny and outy" stamps.  Polymer Clay Express even carries some stamps that come in both a positive and negative.

You need to use some type of release agent to prevent the clay from sticking to the texturing material.  I prefer to use corn starch.  I have never had it affect the clay.  Some people use water.  If you don't like how the impression turned out, just smooth out the clay and try again.  A couplt coatings/impregnations of the clay with corn starch has never been a problem for me. 

I am always hunting in craft stores, hardware stores and anywhere else for items that I can use for impressions.  I got in the habit of doing this many years ago after watching a Victoria Hughes video on Mokume Gane.  She used a wide assortment of objects to press impressions into her clay - phillips screwdriver, adding machine paper core, plastic carpet protectors were some of her favorites.  I now have a couple of drawers full of fun texturing tools.  Look for thinks that will push the clay, not cut it.  Anything with too sharp an edge will cut, not push and distort.

The best texturing plates I ever found are the Cuttlebug Embossing folders.  They are stiff plastic folders designed to emboss paper.  The paper is put in the folder and it is run through the Cuttlebug embossing machine.  What is so cool about this product is that it simultaneously embosses the front and back of clay.  One side is positive and one side is negative.  I purchased some of my folders at Michael's crafts, scrapbooking stores and on-line.  Hobby Lobby and JoAnn Fabrics may carry them also.  I just dust with corn starch and put a sheet of clay inside.  Then I run a roller over the outside.  Because the clay is sandwiched inside it can't slip so I get a nice clean impression.

Oh yeah - don't forget to try impressions in clay with an inked stamp.  You will have to use a archival permanent ink pad.  Do not use Dye Ink pads.  These do not dry.  Be careful, the ink may not try until the piece is baked.    I don't remember if they dry before baking, it has been quite a while since I did anything with an inked pad. I will have to try that technique again.

Here are some jewelry examples the incorporate textures.


This bead is a simple rubber stamp impression with an inked stamp.  You get a nice dark impression.  I don't think you would get the same amount of detail if you just stamped without ink and used paint later to antique it.  Because I stamped on to a flattened oval bead I got an impression only on the top flat surface.   I like the effect of the flat edge all around the impression.


  This brooch's squares texture was made using a Cuttlebug Embossing Folder.  It incorporates both the positive and negative sides of the clay.  I will discuss the coloration techniques in a future posting.


  Another way of getting a raised texture on clay is with a stencil.  Even a paper stencil will work.  Lay the stencil on the clay and run over it with a brayer.  The clay will puff up through the openings.  If you are using a metal or plastic stencil you can increase the puffyness by pressing down on the metal surrounding the openings.   The spiral on the pendant to the left was made with a stencil.  While the clay was still covered with a stencil I highlighted the spiral with silver mica powder.


And don't forget the impressions of Mother Nature!!  If you are using leaves look for ones with nice thick veins and take the impression from the under side of the leaf. 


You can also press items (leaves, rubber stamps, etc) into a thick sheet of clay and use it as a mold to reverse the image. Use the mold to get the final impression for your project.  These earrings were made from a mold I created by impressing a Queen Anne's Lace flower.


Saturday, October 3, 2009

2010 POLYMER CLAY CALENDAR

Marjorie Oxman has just published a beautiful 2010 polymer clay calendar.  One of my brooches is included in the calendar. (Item #20, August)

Check it out:  http://www.lulu.com/content/lulustudio-calendar/2010-polymer-clay-calendar/7238894


Order now and save 25% until 10/11/09
Use coupon code FALLFOTO at checkout.

Tuesday, September 29, 2009

HOW DO YOU DO THAT? 
TIPS AND TECHNIQUES PART 1
3-D COLLAGE - ADHERING THE ELEMENTS

I had someone email me asking if I would consider doing an on-line class.  The person really liked some of my techniques.  Because my style is so "improve" I figured I could never do anything that structured.  However I don't mind sharing my techniques.  Feel free to use these techniques and make them your own.  I think of polymer clay as "Adult Playdough".  Play with the techniques and learn from your mistakes.  Some of my favorite discoveries were from mistakes.  I will do a blog post on some of those in the future.

How do I do 3-D collage jewelry, and get the pieces to stick together?

I work with both baked and unbaked pieces, and also incorporate other items into my collage brooches and pendants.  The pendant on the left was made from baked clay pieces plus a metal imitation coin.  (The techniques for creating the colors and textures will be explained in a future blog post.)  The brooch on the right was constructed with baked and non-clay elements on a base of unbaked clay.


CLICK ON THE IMAGE TO SEE A LARGER VIEW
  1. There is no need to use anything to adhere unbaked to unbaked clay.  It will stick to itself.  However you should use something to adhere baked to unbaked clay.  They will stick to each other, but I have found that the bond is not very strong and may not hold if exposed to any trauma.    Liquid clay is the best "glue" for adhering clay to itself - both baked to unbaked, and baked to baked.  I use Kato Clear Liquid Polyclay.  Fimo used to make a liquid clay.  I don't know if they still do.  It used to come in transparent, opaque white, opaque black and opaque gold.  That would work too.  I would not use Fimo Decorating Gel.  I know that it has a rubbery consistency .  I don't know how that would work as a glue.  I have never tried it.  I don't find the rubber consistency characteristic appealing.
  2. When gluing with liquid clay, don't use a lot.  It makes the pieces slippery so they the elements don't stay where you place them.  Also it oozes out the sides.  Kato clay dries shiny so it will show after baking were it oozed out and will need to coat of varnish to hide.  This could be a problem if you don't want to, or can't, coat the piece.  Some of my patina techniques can't handle a varnish coat.  So I am very careful about how I apply it.
  3. Kato Liquid Polyclay can also be used as a clear coat.  To get a good shine the piece needs to be heated with a heat gun immediately after pulling it from the oven.  I have only tried this a couple of time.  It does work, but you need to be careful so you don't get the piece too hot.  I think that causes it to bubble.  I also don't think it works after the piece has cooled.
  4. Gluing non-clay pieces to clay has caused me some problems.  For many years I used Zap-a-Gap, a gap filling cyanoacrylate glue (like Super Glue brand) to adhere elements to clay.  This was recommended by Victoria Hughes in her articles and videos.  Recently I have had problems.  I don't know if the glue has changed, or if I am asking too much of it for the gluing tasks I am now doing.  I have recently read that it isn't "impact resistant".  (I read that in an ad for a new type of Gorilla brand cyanoacrylate glue that says that brand is).  I will have to try it, because I have had some brass frames pop off when the jewelry piece was dropped.  Someone also told me that the glue goes bad after about 6 months.  That may be true.  I have had some problems with pin backs coming off.  I had been using the same bottle of glue for a while.
  5. I have switched to 2 part epoxy resin to glue on pinbacks.  It holds really well, but is messy to use.  Be careful not to get any glue on the pin mechanism.  Been there, done that!  The mechanism doesn't work well when glued shut.
  6. A lot of people use E6000 to glue on pinbacks.  I used to, but not anymore.  I used to store the pins I wore stuck into the side of a carboard box in my walk-in closet.  It got hot in there in the summer and over time the pinbacks slide as the glue softened. 
  7. I now use 2 part epoxy to glue non-clay elements to be collages, if the pieces are big enough, so that I can put the glue in the middle and not have it ooze out the sides.  I also sometimes use it to glue on my outer frames like in the pendant pictured above.  Because the glue will ooze out on an outer edge I can wipe it off before it dries.
  8. Another glue I have gone back to using for adhering tiny elements is G-S Hypo Cement. 
  9. My favorite source of polymer clay and related products is PolymerClayExpress.com.  I see that they now list a new type of Zap-a-Gap glue.  The description for Flex-Zap says "Use this CA glue where the bond needs to be flexible, such as for gluing buna cord into closure beads, or gluing layers of cured clay together."   Check out the webpage:  http://polymerclayexpress.com/adhesives.html  That page also lists a cyanoacrylate glue from Lisa Pavelka that says it is bakeable.  I have re-baked pieces that had Zap-a-Gap glued elements without any problem.  I will have to try some of these new glues.
  10. I have also been using G-S Hypo Cement to adhere the frames.  The tube had a very tiny nozzle, hence the name, that allows it to be put into tiny spaces.  It seems to work well.

  11. Because I don't really trust any glue and have had some problems with non-clay elements coming off that I have glued to the surface, I have started using both clay and glue to hold elements together.  You will notice copper textured clay in the center of the coin of the pendant above on the left.  This isn't mere decoration.  It actually overlaps the top of the coin and acts as a rivet.  The coin was glued on, the clay was added using liquid clay to adhere it to the baked base then re-baked.
  12. For the brooch above, on the right, I pushed the head pins and beads into the unbaked clay base then added elements on top to hold them in.  Again there is clay in the center of the brass square to act as a rivet that helps hold it in.
I hope you find this information helpful.  Please feel free to leave comments.

Tuesday, September 22, 2009

ART JEWELRY MAGAZINE'S E-NEWSLETTER FEATURED ONE OF MY NECKLACES
Art Jewelry Magazine's September 2009 e-newsletter featured one of my necklaces. Needless to say I am thrilled. It is an amazing magazine. Here is a photo of that part of the newsletter.

http://links.mkt746.com/servlet/MailView?ms=NDIzODkxNAS2&r=NDgyNDI2Njg5NgS2&j=MTM4MjQ3Mjk5S0&mt=1&rt=0


Friday, September 11, 2009

BALTIMORE CLAYWORKS EXHIBITION AND SALE
My polymer clay jewelry will be featured, and for sale, at Baltimore Clayworks "Adornment Adored" exhibition October 3, 2009 through November 6, 2009.
Baltimore Clayworks 5707 Smith Avenue, Baltimore, MD 21209 http://www.baltimoreclayworks.org/exhibition/exhibition_gallery/09/adornment_adored.html
Jewelry pieces included in the exhibition:

Saturday, January 3, 2009

FIRST ARTISTIC COLLABORATION WITH BEADAZZLED OF OREGON IS UP FOR SALE

My first collaboration necklace with BeadazzledofOregon, which she calls Trifold, is now up for sale at her Etsy shop - http://www.beadazzledoforegon.etsy.com/. Check it out and see additional photos of the necklace.

ANOTHER COLLABORATION NECKLACE

Dini Alves (Beaddazzled of Oregon) has created another wonderful necklace "Cleopatra was Here" using one of my polymer clay pieces - Eye of Horus. It is for sale in her shop at Etsy.com. Check it out and see better photos. The eye of Horus is also called the Udjat and is the symbol of health, healing and completeness.

Sunday, December 21, 2008

Artistic Collaboration

Many years ago I made a pendant that I liked a lot and strung it into a necklace I wasn't really happy with. Fancy bead stringing isn't my strength! That necklace was for sale at a Christmas sale at my fellow polymer clay artist's home. She bought the necklace for herself and restrung it. She has always been very good at stringing! That was my first collaboration.
I always liked the idea of collaborative art. Until recently this necklace was the only one. Not long ago a jewelry artist (Beadazzled of Oregon), who does really nice assymetrical beaded necklaces, bought a few of my pins to incorporate into her jewelry. She just emailed me photos of the finished necklace. See more of her work for sale at: http://www.beadazzledoforegon.etsy.com/

Tuesday, November 11, 2008

Other Artists' Influence on My Work

As mentioned in a previous post, work I have seen in books/magazines influences work I do years later. That is why I love looking at as many jewelry pieces as possible. Those images hide in the nooks and crannies of my brain and pop out years later. Here are some examples of my work and a little about where I saw the artist's work.
Convertible pendant/brooch (left) and Chinese coin pendant (right), were created 11/2008. Definitely influenced by Donna Kato. Her latest book, The Art of Polymer Clay Creative Surface Techniques, is full of examples of her simple and elegant asian designs. I love her sense of design.
I remember seeing photos of brooches by Kaz Yamashita in Nan Roche's book The New Clay and absolutely loving them. They were collages made of sheets of unbaked clay forming beautiful, slightly 3-D, abstract wearable works of art. Until today when I looked at the book again to write my review of it, I didn't realize how much of an influence those pieces of jewelry were. Here are two of my pieces made of unbaked scraps of clay. The necklace at left was made in October 2008. The brooch on the right was made in 2006 or 2007. Yamashita used a lot of foiled clay sheets. I haven't used foil on clay for a long time. I think I need to work with that again.

My Favorite Polymer Clay Books

I have listed the polymer clay books I own in previous posts. Now it is time to talk a little bit about some of my favorites. The New Clay by Nan Roche 1991. If you are new to polymer clay start with this book. As far as I know, it was the first book ever published on polymer clay. Us early clay people called it "The Bible". It really helped me. A friend and I tried reproducing african trade beads (glass venitian millefiori beads) about a year before the book came out - with limited success. This book really helped us improve our techniques. It does spend most of its time on millefiori cane techniques. It also covers surface techniques and mokume gane. It has a lot of examples by Victoria (Tory) Hughes, an early clay pioneer and one of my favorite clay artists. Looking at it again, after a very long time, I am amused to see how much many of the examples influenced my work. Polymer the Chameleon Clay by Victoria Hughes 2002 Tory is one of my favorite polymer clay artists. I first came across her work in The New Clay and also in articles in Ornament magazine for creating jade and amber. This book covers techniques for creating faux jade, amber, turquoise, ivory, lapis lazuli, coral, agate, faience, and silver. It has very nice example of work by lots of polymer clay artists. The Art of Polymer Clay by Donna Kato 1997 Donna Kato is my other favorite polymer clay artist. This book covers a lot of interesting techniques. One that I liked a lot was her way of making kaleidoscope canes. Caution: If you try this technique and follow the number of steps in her photo of the steps, your cane won't be as intricate as her examples. Repeat the steps one more time to get a more detailed pattern. This was the first example I ever saw of incorporating translucent clay into a millefiori cane. It really expanded my repetoire. Another one of the techniques I came to love is her Balinese Filigree - using tiny clay snakes to create an all over pattern. She has nice techniques for imitation natural materials including the use of inclusions in the clay. I have made great use of other techniques in the book including her Nonpareil Marbled Paper( what I called feathering of the clay sheet) and manipulating cured clay. She also covers making vessels and sculptures. It is just a great book full of lots of techniques and elegant examples. The Art of Polymer Clay, Creative Surface Effects by Donna Kato 2007 This is Donna Kato's second book. It is a great book with lots of techniques and gorgeous examples by her and lots of clay artists. It is a good companion to her other book. Techniques covered are mica shift, image transfers, creating texture, paints/inks/powders, special effects with liquid polymer clay and some 3-D effects (armatures, molds, bas-relief, making stencils) 400 Polymer Clay Designs - A Collection of Dynamic and Colorful Contemporary Work - Lark Books 2004 (intro by Irene Semanchuk Dean) This is the book I look at most often. In fact the pages are now falling out. Once you learn techniques for working with the clay this is a great book for inspiration.

Additions to my polymer clay book library

Since posting a list of my polymer clay book library, I have added a few more. Polymer Clay Beads by Grant Diffendaffer (2007) In addition to covering some comon techniques (mica shift, mokume gane, bead shapes) he does some very interesting techniques for bead shapes and texturing that I haven't found elsewhere. Polymer Clay Creative Techniques by Judy Belcher (2006) I like this book for its good clear explanations of a lot of techniques. It also has a lot of nice examples in its gallery sections. Some of the techniques covered are skinner blend, tesselation, encased beads, mokume gane, enameling, Ikat, dye resist, mica shift effects, simulating wood and raku). OOPS! Turns out that I already owned this book. I am going to put it up for sale at Etsy.com Polymer Pizzazz, 27 Great Polymer Clay Jewelry Projects, Kalmbach Books. These book is a compilation of polymer clay articles that appeared in Bead and Button magzine over the years. If you haven't had a subscription for many years this a a good compilation. That magazine doesn't have many polymer clay articles anymore. I bought the book even though I have them all in the magazine just to get them all in one, easy to find, place. Some good techniques are covered - marbeling with liquid clay, surface painting, filigree beads, mica shift using texture sheets, Sarah Shriver's complex asymmetrical canes, Patricia Kimle's leaf impressions, image transfer with Lazertran Silk. lockets and inro boxes, and faux techniques (cinnabar, enamel, stone).

Thursday, April 17, 2008

In the Beginning......

I starting my artistic life with a BA in Art decades ago. Originally I was a photographer and printmaker. I started working with polymer clay in 1990. I don't remember how I found out about the clay. I do remember that the first clay I found was Cernit. A friend and I tried to recreate the African millefiori trade beads that we both collected. The beads were a good imitation, until they were baked. They didn't stay hard edged. The contours were soft and the appearance translucent. Eventually I discovered Fimo and got the nice hard edgez, and opaque colors, I was looking for.
I have purchased A LOT of books, videos and magazines to learn how to work with the clay. I will post lists of the books, and videos, in future blogs and I will talk about some of them in the future.
My first book purchase was The New Clay by Nan Roche, 1991. This was the "Bible" for us early polymer clay people. I think it was the first book devoted to working with the clay. My skills really improved once I had this book. Even though I find a lot of the examples simplistic now, it is still a very valuable book. It covers a lot of techniques with easy to follow instructions.
When learning to work with polymer clay, it really helped me to learn with someone else. It also didn't hurt that my fimo buddy has a PHD in astro physics. Two brains are better than one. My brain leans right and Mary's brain leans left. So between the two of us we have a nice big balanced brain. Unfortunately she lives in another state. But we do get together every year for our annual Arts and Crafts week. It is total clay immersion for 10 days. We seem to be in sync each year about the polymer clay, and precious metal clay, techniques we want to work on. There just might be something to that astrology sign thing. We have the same birthday, though different birth years.
I discovered while making my very first millefiori cane that I would rather play with the scraps. As Mary was busy making new canes, I was busy playing with the scraps from my one and only cane. Here is what I made with the slices from that very first cane. I have to laugh every time I look at it. I've come a long way since then! However, one thing that hasn't changed is that I still love asymmetrical abstract composition.

My Library of Polymer Clay Books

In the 18 years that I have been working with polymer clay I have accumulated a lot of books. In future postings I will give you my thoughts on them. In my first posting I talked about my very first book, my polymer clay bible - The New Clay by Nan Roche. Here is the complete list of the books I own, in alphabetical order by author: - The Art of Jewelry - Polymer Clay by Duncan Aimone, Katherine 2006 - Creative Techniques for Polymer Clay Jewelry, 40 Projects by Bananto, Nanetta 2005 - Polymer Clay Creative Traditions by Belcher, Judy 2006 - Making Polymer Clay Beads by Blackburn, Carol 2007 - Creative Clay Jewelry by Dierks, Leslie 1994 - Creating Your Own Antique Jewelry by Dupou, Chris 2000 - Polymer Clay, Exploring New Techniques and Materials by Fago, Celie and Sargeant, Georgia 2002 - Creating with Polymer Clay - Designs, Techniques & Projects by Ford, Steven & Dierks, Leslie 1996 - Polymer Clay, Creating Functional and Decorative Objects by Gikow, Jaqueline 2001 - Fast Polymer Clay by Heaser, Sue 2003 - Polymer Clay Techniques Book by Heaser, Sue 1999 - Celebrations with Polymer Clay - 25 Seasonal Projects by Helm, Sarajan 2003 - Polymer the Chameleon Clay by Hughes, Victoria 2002 - The Art of Polymer Clay, Creative Surface Effects by Kato, Donna 2007 - The Art of Polymer Clay by Kato, Donna 1997 - Polymer Clay Inspirations by Kimle, Patricia 2005 - Polymer Clay, The Art of Clay Modeling by Maguire, Mary 1996, 2003 - Polymer Clay Surface Design Recipes by Marshall, Ellen 2005 - Stamping Effects in Polymer Clay by McCall, Sandra 2006 - Foundations in Polymer Clay by McGuire, Barbara 1999 - Creative Stamping in Polymer Clay by McGuire, Barbara 2002 - Creative Ways with Polymer Clay by McMillan, Dotty 2002 - Images on Clay by McNeill, Suzanne 2000 (Can Do Craft Series Booklet featuring Nan Roche and Barbara McGuire) - Images on Clay II by McNeill, Suzanne 2002 (Can Do Craft Series Booklet featuring Barbara McGuire - Stamping Polymer Clay and Wire by McNeill, Suzanne 2002 - Expressions in Clay by McNeill, Suzanne 2003 (Can Do Craft Series Booklet featuring Barbara McGuire - Romantic Brooches Made of Fimo by Meyer, Marlis (Booklet put out by Fimo's German Manufacturer) No Date - The New Clay by Roche, Nan 1991 - Faux Surfaces in Polymer Clay by Semanchuk Dean, Irene 2003 - The Weekend Crafter, Polymer Clay by Semanchuk Dean, Irene 2000 - 400 Polymer Clay Designs 2004